10.31.2008

A Pumpkin and a Drill

*Update*

So my pumpkin didn't turn out so bad, Eddies is better of course, but I got home from work late and threw this together last minute before the trick-or-treaters were "suppose" to come. The BF had a whole bowl ready for them and was really excited to hand out all the sweets...well, except no one came. I tried to tell him that since we are in an apartment building its not likely that we would get anyone, but I think he was the one who really wanted all the candy. Anyway here is my last minute Halloween pumpkin with our initials


_____________________________________________________

Taking a cue from the wonderfully talented Eddie Ross, I've decided to go home and have fun with some new drill bits and a pumpkin. I'm hoping that I can come up with something along these lines:


If I like how mine turn out, I'll be sure to post pictures...if not use your imagination, and base it off Eddies picture.

Thank you Dad for the new drill bits, I am very excited to use them for the first time!!

pictures from Eddie Ross

The Witches

If you have not been to Salem, MA I highly recommend it!! I mention it today because of course its Halloween and Salem is extra special today, but going to Salem and learning about the Salem Witch Trials is just as cool any other day of the year.

Back in high school, in order to graduate, every senior had to do a year long research project on a topic of our choice. We had to log research hours, consult an expert on the subject, write a very long paper, and then present our findings to a panel for a pass/fail. Basically my future was based on this one project, and if I failed I would be sent back to re-do everything (of course I passed though). My topic of interest was the Salem Witch Trials! So for one year I immersed myself in the happenings of Salem, MA around 1692. I have to say, it was the most interesting topic I studied all 4 years of high school (but of course I am biased).


During my many trips to Salem I picked up this "Girls Night Out" poster. I had it framed and to this day it hangs in my old bedroom- I love it!


Back to 21st century Halloween...this has to be my favorite pumpkin I've seen!


HAPPY HALLOWEEN EVERYONE!!

10.29.2008

Flowers and Tablescapes Eye Candy

I first heard about Artfool from Martha Stewart, she had them on her show for a Halloween special and they created the most beautiful "creepy" flower arrangements I had ever seen. I went right on their website to check out more and everything I saw went right into my wedding inspiration folder. Now I'm not even engaged, but a girls gotta get ideas somewhere for that someday (I really hope the BF doesn't see this post...hmmm or maybe I do, hint hint).

Anyway, here is some beautiful Wednesday eye candy:


All images from the Artfool website

10.28.2008

Making a Pillow


OK, so I am by no means a seamstress...I try, but my skills consist of mostly straight lines. Straight lines do come in handy when making pillows though, and someone asked me how I made those initial pillows on the my bed so here goes...

I of course forgot to take pictures so please excuse my graphics. I started out wanting to put a zipper in my pillow but I also know that I am perfectionist so if it didn't come out exactly right I would be mad- so I came up with the idea to make a slip cover for the pillow.

My pillow is a 14x14 pillow so I cut out two pieces of fabric, one 15x15 (an inch all around to allow for sewing) and a 15x20 piece.

Take the 15x20 piece and cut it in half. Finish, or hem (again I'm not a seamstress so I don't know the correct term) the long side of each piece you just cut. So, you should have two pieces of fabric now, each with just one long side hemmed. We'll call those A & B


Next, take the 15x15 piece and place it right side up. Take A and lay it on top of the 15x15 piece right side down, with the hem you made in the middle. Then take B and place it on top of A right side down, again with the hem you made in the middle- keeping in mind to overlap A & B by about 2.5 inches.


Pin all three pieces together, and sew all the way around.


When done sewing turn right side out from the opening in the middle and there you go!

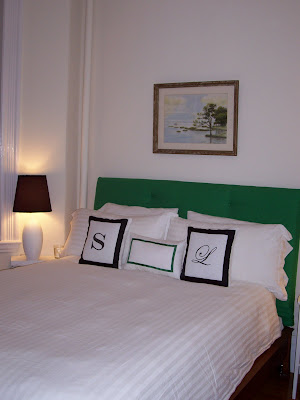
I did my pillows in white fabric and once I had them all put together I used some black fabric paint to make the initial, and black grosgrain ribbon to frame them out.

One thing to keep in mind: Wash all fabric first, that way when you need to take off the slip cover and wash, it will not get all out of shape. Again, I am no seamstress so I did the best I could here, if you have questions or this does not make sense leave a comment and I'll do my best to try and explain again.


If any of you make any pillows please take pictures, I'd love to see your projects!!

10.27.2008

Last Update...at Least for Now

Last update for now...or till I change my mind again. My inspiration picture changed once, so I'm sure there will be more changes- but for now, here it is:

I painted the lamps white, made the two pillows with our initials and trimmed them in black grosgrain ribbon, and changed the bedding to plain white.
*More buttons will be added to the headboard, they were ordered online but had not yet arrived when I took these pics.


I do like the idea of zebra pillows as Erin from Elements of Style suggested, so I'm on the lookout for some- but to add black to the bed I made the initial ones for now. I'd also like a nice cashmere throw for the end of the bed- I'm thinking a bright orange.

I'd like to thank Kay and Erin for posting both inspiration pictures- keep the good ideas coming, because who knows what I will fall in love with next!

10.22.2008

My Mini Gallery Wall

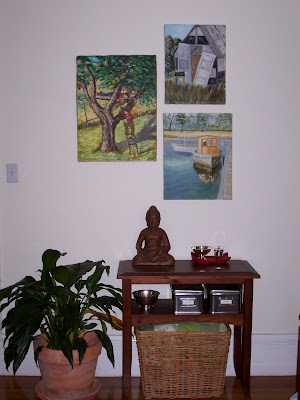
The BF left for class one night and I went for it....I decided it was time to make my gallery wall. I took the three pictures that my grandmother painted from over the bookcases and grouped them on the wall over the little side table.


The Buddha moved here, this is the BF's favorite because his family is Buddhist- we didn't just jump on the Buddha bandwagon


I got really excited about the mini wall, so I moved on to the hallway. Here is what it looked like before, there was just an antique mirror over the hall table and it looked lost (and messy, I was in the middle of making alot of changes and just snapped the pic)

Then after....the faces found a new home


It doesn't look centered, but it is. I think this one will grow eventually, even though the BF doesn't want any more added to it, I don't think its finished quite yet.


Yeah for gallery walls!!


Always Changing my Mind...

Well it looks like the coffee table I posted below is a no-go... at 53 inches I fear its a little large for my city apartment. Good news, I'm trying to convince my Mom that painted it would look amazing in her family room and she should buy it (aka keep it for me till I have a larger place)

The bedroom has not made many changes since last time, but here is a picture with the bed made and a picture hung over the bed.


I had originally wanted to add light blue into the mix from the inspiration picture, BUT I just went over to Erin's blog Elements of Style and almost died when I saw another HOT Kelly green headboard!! This time with no blue, and I'm really loving it! I'm thinking I should nix the blue and spray paint the lamp bases white (because I'm still kinda liking the black shades).

I know, I know- I am the queen of changing my mind.

photo is of Lee Kleinhelter's house published in Cottage Living, but found on Elements of Style blog

10.21.2008

How do you feel about this?

Do you like this coffee table for my family room? Imagine it painted a color. I need help, I'm not quite sure....thanks!!